STEP 1: Before You Begin
Included with your Pro Motion Menu Kit is a directory named 'DVDSP_Button_Shapes' which includes custom buttons for DVD Studio Pro, designed specifically for your menu. If you are using the default colors of the menu, you are ready to open up DVDSP and proceed to the next step. However, if you decided to customize the colors of your menu, there may be an extra step you will need to do in Photoshop before you import them into DVDSP. To verify your menu requires this extra step, navigate to the 'DVDSP_Button_Shapes' directory, then open the directory that corresponds to the format of DVD you are creating (either HD, SD, or PAL). If you see any files in that directory which have 'unrasterized' in the filename, then those files will have to be modified before being brought into DVDSP. If none of the files are unrasterized, you may skip to page 2 of this tutorial.
The Custom Shape
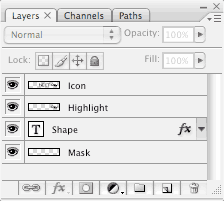
When you open the unrasterized button shape in Photoshop, you will see how Custom Shapes are structured. In this demonstration, I will be using '01_SD_Scene_Right_unrasterized.psd' from the Butterfly Bliss Pro Motion Menu Kit, however this tutorial can be used with any menu.

The top layer is the 'Icon' layer, which is only used as a visual representation of your button in DVDSP (the image that is displayed in the custom shapes Palette). The second layer is the 'Highlight' layer. This contains the graphic which is displayed when the button is highlighted and selected. The color(s) of this graphic is selected in DVDSP. Below this layer is the 'Shape' layer, the one which we will be modifying. This layer contains the image for the button that will be embedded into the background of your menu. This layer usually consists of text which is displayed at all times, even when your buttons are not highlighted. The bottom layer is the 'Mask' Layer, which is used for drop zones if your button is to have a still image or video displayed in it.
Change the Text Color
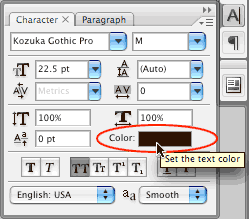
Before we modify the Shape layer, turn off the visibility (little eyeball) of the Icon layer so we can see the changes taking effect to the Shape layer. Now select the 'Shape' layer which is actually a text layer that can be easily modified. Once selected, change the color of the text in the 'Character' palette to the new custom color you have chosen in After Effects (usually the 'Foreground' or 'Menu_Buttons' color).
 Rasterize
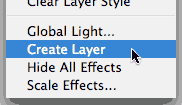
Now that your text has the appropriate custom color, it is time to rasterize the text, which converts it from an editable text layer into a fixed graphic that DVDSP recognizes. Do this by right clicking on the Shape layer and selecting 'Rasterize Type'. DVDSP does not recognize layer styles either, such as strokes, glow effects, drop shadows, etc... so those will have to be rasterized as well. To do this, right click on the 'fx' which is to the far right of the layer, and select 'Create Layer(s)'.

If any warning messages pop up, just click 'ok'. Now select all the Shape layers together using the shift key, such as the 'Shape' layer, the 'Shape's Outer Glow' layer, etc., then right click and select 'Merge Layers'. Make sure the Shape layer was not renamed to something else, it should still just be called 'Shape'. What this step did was merge the text and all the layer styles that it had applied to it into a single rasterized layer that DVDSP will recognize.
Save As and Repeat
Turn the visibility of the 'Icon' layer back on, and you are ready to 'Save As'. Maybe instead of '_unrasterized', save it as '_rasterized'.
You will also notice a file in the directory which has the same name but without the 'unrasterized'. This file has already been prepared for DVDSP using the default colors of the menu. You can now modify the other unrasterized files using the same steps. Once you have modified all of them (usually just 2), you are ready to start authoring in DVDSP.
Next Page» STEP 2: Importing Assets & Setup
