STEP 3: Assemble Your Menus
Create the Buttons
It's time to create all the buttons using the custom shapes. So go ahead and select the main menu, then in the shapes tab, locate the correct shape for the button you are creating (for the main menu it might be the 'Menu_Item'), and drag it into the Menu View, placing it where it belongs. For reference as to which buttons go where, please refer to the product page of your particular Pro Motion Menu Kit, or you can open the Adobe Encore Menu Templates also provided in the Kit.
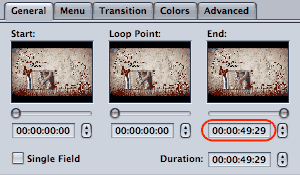
Note: If your Main Menu and Intro are combined (AE CS4+), you must set the 'Loop Point' to 10 seconds (00:00:10:00), located in the General tab of the inspector.
Customize the Highlight Colors
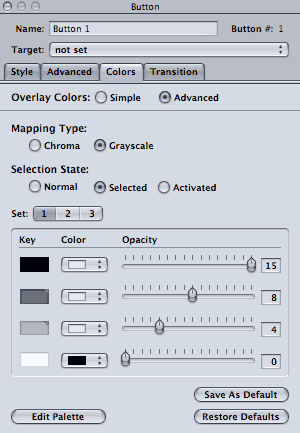
With the button selected, navigate to the Inspector (bottom right), and go to the 'Colors' tab. Change the 'Overlay Colors' from Simple to Advanced and confirm the 'Mapping Type' is set to Grayscale.

Go ahead and customize the colors to your liking for both the 'Selected' State and the 'Activated' State. The 'Key' refers to the different areas of the highlight which can have it's colors changed. The 'Color' is where you specify the color you would like those areas to be, and the 'Opacity' is the opacity of those areas, '0' being completely transparent, and '15' being completely opaque. To customize the available colors, click the 'Edit Palette' at the bottom of the Inspector, then in the palette that pops up, select a color and change it to a custom one.

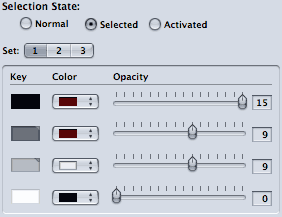
For the 'Selected' State of this particular menu, Butterfly Bliss, I decided to set the top color (which has the Key color of black) to the custom Foreground Color of my menu, with an opacity of 15. I also set the dark gray Key to the custom Foreground Color with an opacity of '9', and finally the light gray Key to white, also with an opacity of '9'.

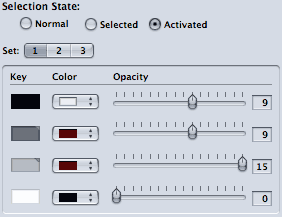
For the 'Activated' State, I chose to just reverse the color and opacity of the black key with that of the light gray key. Your colors may be completely different, however this just gives you an idea of how you can differentiate the 'Selected' and 'Activated' States.

Once you have both the 'Selected' and 'Activated' colors chosen, go ahead and click 'Save As Default' (towards the bottom of the Inspector).
Now that the colors are setup the way you want, go ahead and drag in the remaining buttons from the shapes tab for all the menus. For the other menus, you may have to click 'Restore Defaults' for the colors to change to your custom ones.
 Set Chapter Points
Now make sure all your chapter points are placed in your tracks. If you did not export them from FCP, you will have to scroll through your tracks and place them now. I usually like to make the number of chapters equal a multiple of 6 (or however many scene selection boxes your menu has) so that there are no empty boxes.
Configure the Scene Selection Menu
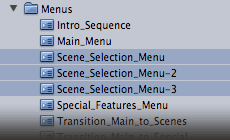
Once all your chapters are placed, lets duplicate the Scene Selection Menu as many times as necessary. To duplicate, select the menu in the Outline tab, right click, and select 'Duplicate'. So if you have 18 chapters in your video, and 6 Scene Selection boxes per menu, you will need to duplicate the menu twice for a total of 3 Scene Selection menus. You can also delete the 'BACK' button from the first menu, and the 'NEXT' button from the last menu, as they are not needed.

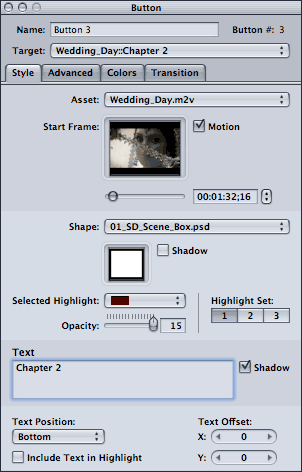
We can now link up the chapters to each of the scene selection boxes. Do this by selecting the Scene Selection Box on your menu, then in the Inspector, set the 'Target' to your main video track, and the appropriate chapter.

In the Inspector under the 'Style' tab, set the asset to your main video, make sure 'Motion' is checked, and set the timecode to where that particular chapter starts (refer to the track). Feel free to add text if it looks appropriate with the menu.

Repeat this process so each scene selection box is linked to the appropriate chapter, and it's video plays in the box.
Menu End Action & Button Targets
Now let's walk through all the menus, linking their end actions and buttons to their correct targets. I'm going to start with the Intro Sequence (if your Intro Sequence is combined with your Main Menu, you can skip to the Main Menu section below). Select the menu in the Outline tab, then in the Inspector, under the General tab, set the 'At End' action to 'Timeout' with '0 Sec' and the 'Action' to 'Main Menu'. This tells the Intro Sequence to jump to the main menu after playing through once.

Lets move on to the Main Menu by selecting it in the outline. In the Inspector, confirm that the duration of the menu goes all the way to the end of the animation.

Note: If your Main Menu and Intro are combined (AE CS4+), your duration will be longer (00:01:00:02), and your 'Loop Point' will be set to 10 seconds.
Setting Up a Script to Start Main Menu at Loop Point (AE CS4+ Users Only)
Since AE CS4+ users have the intro sequence and main menu combined into a single motion background, you must configure a script so that when returning to the main menu from a sub-menu, it starts at the loop point and not the beginning of the intro.
1. Begin by choosing 'Project > Add to Project > Script'.
2. Now double-click the script in the Outline tab to open it up in the Script Editor. By default, the script will contain one Nop command (which does nothing).
3. Select this command in the Script Editor. Then, in the inspector palette, switch it to a Jump command via the Command pull-down menu.
4. When you do this, an option will become available for the jump target. Set it to the 'Main_Menu_with_Intro'.
5. Then simply check the box labeled 'Start at Loop Point'.
Now start linking up the buttons to their appropriate transition menu by selecting the Button, then in the Inspector, set the 'Target'. The button which plays your main video should link to the 'Transition_Main_to_Video' Menu. The Scene Selection button should link to 'Transition_Main_to_Scenes', and the Special Features button should link to 'Transition_Main_to_Special'.
Lets complete all the transition menus. Just like the Intro Sequence we will set all the 'At End' actions to 'Timeout 0 Sec' and the 'Action' as follows:
'Transition_Main_to_Video' Menu will link to Chapter 1 of your main track.
'Transition_Main_to_Scenes' will link to the first Scene Selection Menu
'Transition_Main_to_Special' will link to the Special Features Menu
'Transition_Scenes_to_Main' will link to the Main Menu (AE CS4 Users will link to Script 1)
'Transition_Special_to_Main' will also link to the Main Menu (AE CS4 Users will link to Script 1)
Now that those are done, select the Special Features Menu in the Outline, and configure those buttons accordingly. The menu item buttons should link to their corresponding Track or Slideshow. The main menu button should link to the 'Transition_Special_to_Main' Menu.
The only menus left should be the Scene Selection Menus. Make sure each one's 'Main Menu' button is linked to 'Transition_Scenes_to_Main' Menu. If you have more than one Scene Selection Menu, your next button should link to the next Scene Selection Menu, and the Back button should link to the previous Scene Selection Menu. For example, if you have three Scene Selection Menus, the next button on the first menu should link to the second menu, the next button on the second menu should link to the third menu, the back button on the second menu should link to the first menu, and the back button on the third menu should link to the second menu.
Setting Track End Jumps
Lets not forget to set the Track/Slideshow end actions. Do this by selecting the track in the Outline, then in the Inspector, set the 'End Jump' to the appropriate menu. For the main track, you might want it to jump to the Intro Sequence or Main Menu. For the Special Feature tracks, you will probably want them to jump to the Special Features Menu.
 Fixing the Remote's Menu Button
Since we have our transitions setup as menus, when you press the menu button while watching the main track, it will take you back to the last menu, which happens to be the transition into the main video. We don't want this to happen, we want the menu button to take you back to the menu instead of the transition. So to do this, with the main track selected (the track that is accessible from the main menu), go to the inspector, under the 'General' tab, and go down to 'Remote Control'. Change the 'Menu' button from 'Same as Disc' to your Main Menu. Now when the menu button is pressed on the remote, it will function correctly.
Set the First Play
Confirm that the First-Play of your disc is set properly by selecting your disc from the Outline panel (possibly still named 'UNTITLED_DISC'), then in the Inspector, Select the pulldown menu for "First Play" and assign it to your Intro_Sequence (or Main_Menu_with_Intro for AE CS4 users).
All your menus and tracks should now be linked up properly. You are ready for the final step!
Next Page» STEP 4: Finish & Burn
