STEP 4: Finish & Burn
Now that all the buttons are linked up correctly, it's time to go back and double check a lot of your settings to make sure everything is the way you want it. I will go through all the pertinent ones below:
Button Routing
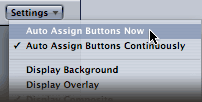
Don't forget to set these. You can have DVDSP set them automatically by selecting the menu, then going to 'Settings' at the top of the Menu View, and clicking 'Auto Assign Buttons Now'.

You can also set them manually by selecting each button, and in the Inspector, go into the 'Advanced' tab.
Encoding Preferences
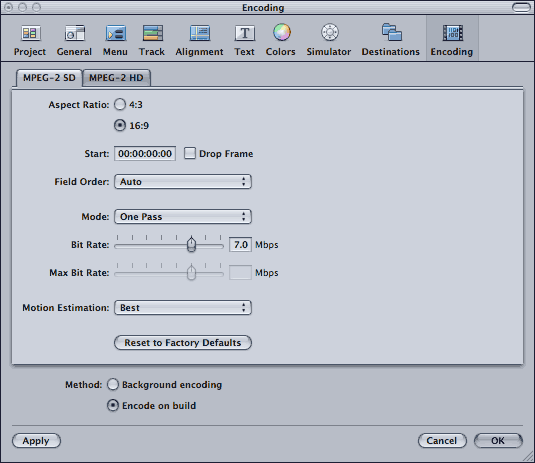
Now confirm that your dvd's Encoding Preferences are set correctly. Access the Preferences by navigating to 'DVD Studio Pro > Preferences'. Under 'Encoding', in the 'MPEG-2 SD' Tab, you can set the Aspect Ratio to 16:9. Also set the bitrate to your desired settings. For DVD Menus I prefer to do 'One Pass' '7.0 Mbps'. Click 'Apply' / 'OK'.
 Disc Name
This is usually set to the name of your project, however you can change this by selecting the disc in the outline, and changing the name in the inspector.
Scripts
For the more advanced user, you might want to setup some scripts for special menu functions. If you are an AE CS4 user, we have already used a script to start the main menu at the loop point. You are welcome to enhance your disc with other scripts if required and you know how.
Simulate/Test
Now comes the most important part. It's time to simulate your project before you burn to make sure everything works as it should. Click on 'Simulate' in the Toolbar, and go through each menu, testing out every button to make sure it functions the way it should. If you notice something doesn't work right, go back, fix it, and run the simulation again.
Once you finished Simulating, its time to burn! Select 'Burn' in the Toolbar, pop in your disc, wait for it to render out all your menus, and let it burn.

